Where to find the best free stuff and how to actually use it
A practical guide for 3D artists - from first render to photorealistic results
We all have that one moment in 3D: you swap out a boring, flat light for a real HDRI, hit render, and suddenly everything just clicks. Shadows look right, reflections look real, and your scene finally feels like it exists in the real world. Honestly, it feels like a bit of a cheat code.
That’s the magic of HDRI lighting. The best part? You don’t need to spend a dime to get started. There are amazing free libraries out there, and once you know the ropes, you’ll never go back to basic lights again.
In this guide, we’re going to break it down simply: what HDRIs are, where to grab the best ones for free, and exactly how to plug them into your workflow.
1. So, what exactly is an HDRI?
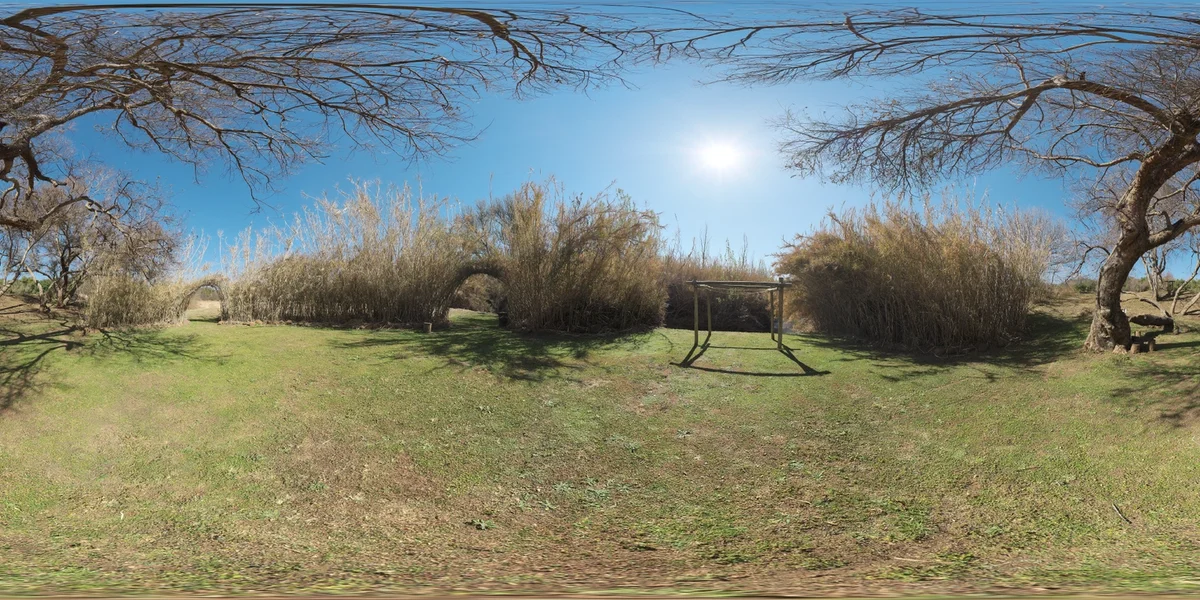
HDRI stands for High Dynamic Range Image. Don’t let the name scare you, it’s basically just a 360-degree photo that captures all the light data from a real location, not just the colors.
A normal photo (like a JPEG) is like a flattened-out version of reality. If you try to use it for lighting, it won’t have enough "punch" for the highlights or enough detail in the shadows. An HDRI keeps that data, so the sun in the image actually acts like a sun in your 3D scene.
Think of a regular photo as a snapshot, and an HDRI as a measurement. One records appearance - the other records physics.
In 3D software, when you drop an HDRI into your scene as an environment, the renderer reads those light values and uses them to illuminate your model with mathematically accurate, real-world light. That's why it looks so right, because it IS right. It's actual photons from a real place, doing real things to your virtual geometry.
HDR vs EXR: Which one should you pick?
You’ll mostly see .hdr and .exr files. They both work great, but .exr is usually the pro choice because it’s better at compressing without losing quality. If you have the choice, go with EXR.
2. Why use them? Can't I just build my own lights?
You definitely can, and for some specific product shots, you’ll still want that manual control. But for most scenes, HDRIs give you a massive head start because:
Natural, complex light bounce that feels real
Reflections that match the environment (crucial for metal, glass, wet surfaces)
Ambient occlusion that comes naturally from the scene's geometry and light direction
Sky gradients that look like actual skies, not gradients
Mood - HDRIs carry the feeling of a real place
Plus, it’s just faster. You can spend an hour tweaking studio lights, or 30 seconds dropping in an HDRI and rotating it until it looks perfect.
Pro Tip: You can use an HDRI for lighting while hiding it from the camera background - your render gets all the natural light while your backdrop stays clean for compositing.
3. Where to get the good stuff (for free!)
Don’t waste your time on sites that only give you tiny "previews" for free. These are the real-deal libraries that pros actually use:
The absolute king. Everything here is CC0, which means you can use it for anything, commercial or personal—without paying a cent. High quality, massive variety, and no account needed. Bookmark this one immediately.
License: CC0 - completely free, even commercial
Resolutions: 1K to 16K
Categories: 250+ environments
File formats: .hdr and .exr
ambientCG (ambientcg.com) - HDRIs + Textures
Mostly known for textures, but their HDRI collection is growing fast and is also completely free. It’s great for urban environments and interior shots.
HDRI Haven was the predecessor to Poly Haven and technically redirects there now - but if you find old tutorials referencing it, know that the library merged into Poly Haven. Same great assets.
A smaller collection, but worth knowing. Good for aerial and nature-focused HDRIs that aren't covered as well elsewhere. License varies per asset, always check before commercial use.
Unsplash / Humus HDRIs (hdrskies.com)
More curated, fewer in number, but some of the most beautiful sky HDRIs available. Particularly good for architectural visualization work where a dramatic sky can make or break a still.
Quick Reference: Free HDRI Sources
Source | Cost | Best For |
Poly Haven | Free (CC0) | Everything - most comprehensive |
ambientCG | Free (CC0) | Interiors, studios, urban scenes |
OpenFootage | Free* | Aerials, nature, wide landscapes |
hdrskies.com | Free / Paid | Dramatic skies for archviz |
Textures.com | Freemium | General environments, some HDRIs |
* Check individual asset licenses for commercial use.
4. Putting it to work
So you’ve got your file. How do you actually use it? While every app is a little different, the goal is always the same: you’re telling your software to wrap this image around your scene like a giant, glowing balloon.
Blender
Blender makes this beautifully simple:
Open the Shader Editor and set it to World (top left dropdown)
Add an Environment Texture node (Shift+A → Texture → Environment Texture)
Connect its Color output to the Background node's Color input
Click 'Open' on the Environment Texture node and load your .hdr or .exr file
Render - you're done
To rotate the HDRI (adjust where the sun is), add a Texture Coordinate node and a Mapping node between them. The Z rotation on the Mapping node spins the entire environment.
Blender Tip: In the Viewport, press N to open the sidebar → View tab → check 'World Space Lighting' to see the HDRI in your viewport in real-time without needing to render.
Autodesk Maya (Arnold Renderer)
In the Render Settings, make sure you're on Arnold Renderer
Open the Arnold menu → Lights → Skydome Light
In the Skydome Light's attribute editor, find the Color swatch and click it
Switch the color type to 'File Texture' and browse to your HDRI file
Adjust the Intensity and rotation as needed
For RenderMan or V-Ray in Maya, the process is similar but accessed through their respective light dome primitives. The concept is identical - you're always feeding the HDRI file into a spherical/dome light that wraps around your scene.
Cinema 4D
Go to Create → Environment → Sky (or Physical Sky if you want more control)
In the Sky's material, open the Luminance channel
Enable Texture and load your HDRI
Set the texture projection to Spherical
Adjust the global illumination settings in your Render Settings for best results
Whatever software you use, the fundamental idea is the same: you're placing a glowing sphere around your scene that emits light based on the values in the image. The rest is just knowing which menu to find that sphere in.
5. Choosing the Right HDRI for Your Scene
This is where the craft comes in. A technically perfect render with the wrong HDRI will still feel off. Here's how to think about selection:
Match the Mood, Not Just the Light
An HDRI carries an emotional quality. A golden-hour HDRI on a suburban street will feel warm and nostalgic. The same street under an overcast HDRI feels muted and melancholy. Neither is wrong, they're just different stories. Ask yourself what feeling you want the viewer to have before you start scrolling.
Consider the Reflections
If your scene has reflective surfaces, metal, glass, polished stone, wet pavement - the HDRI will show up in those reflections. An outdoor HDRI in an indoor product scene will look weird the moment the camera catches a reflection of a distant mountain in the chrome. Match the environment logic of your scene.
Resolution Matters More Than You Think
The resolution of an HDRI affects how sharp the light sources are. A low-res HDRI won't render a crisp sun shadow, the sun becomes a blur. For scenes with hard shadows, use at least 4K, and 8K if your render times allow it.
Time of Day = Light Colour
Golden hour HDRIs have warm orange/red tones. Noon HDRIs are harsh and white. Overcast skies are soft and diffuse (fantastic for portraits and product renders, they act like a giant softbox). Night HDRIs can be dramatic with street lights and stars. Browse with your scene's time-of-day in mind.
Creative Tip: Mix an HDRI for lighting with a completely different background image. Use the HDRI's lighting data but render your own sky or environment as the backdrop - great for compositing into live footage.
6. Common Mistakes Beginners Make
A few things that trip people up early:
Using an HDRI at full intensity without adjusting it. Some HDRIs are very bright. Drop the intensity to 0.5 or even 0.2 if your scene is blowing out. The default intensity in most software is 1.0, which is often too hot.
Ignoring the rotation. The sun position in the HDRI matters. If your scene logic suggests morning light from the left, but the HDRI's sun is coming from the right, nothing will feel grounded. Spend 30 seconds rotating until the shadows make sense for your story.
Using a 1K HDRI for final renders. Fine for quick previews, terrible for final output. Shadow edges will be soft and fuzzy where they should be sharp. Use 4K minimum for any render you'd actually show someone.
Forgetting gamma/color space settings. Make sure your HDRI is loaded as Linear or Raw, not sRGB. Loading as sRGB will double-gamma the image and wash out all the light values. In Blender this is handled automatically; in other software, always double-check.
Not experimenting. The best HDRI for a scene often isn't the obvious one. A cloudless sunny day HDRI on a drama render can feel too cheerful. Try the unexpected choice.
7. Beyond the Basics - What's Next
Once you’re comfortable with the basics, try mixing things up. Use an HDRI for the "soul" of the lighting, then add a manual "key light" to highlight specific parts of your model. It’s the best of both worlds.
HDRI + Manual Light Mixing
HDRIs don't have to work alone. A common pro technique is using an HDRI at low intensity for ambient bounce and reflections, then adding a single directional light to control the key shadow. You get the natural look of HDRI with the compositional control of manual lighting.
Shooting Your Own HDRIs
With a DSLR or mirrorless camera, a tripod, and a fisheye lens, you can shoot your own HDRIs from any real location. Software like PTGui or Hugin stitches the bracketed exposures into a proper panorama. This is especially powerful for archviz work where you want renders to match the actual site.
HDRIs in Game Engines
If you work in Unity or Unreal Engine, HDRIs work similarly, they're used as skyboxes with lighting bake contributions. The same Poly Haven library works perfectly. Unreal's built-in HDRI Backdrop actor makes setup particularly fast.
Exploring Asset Libraries Built Around HDRI Workflows
As your renders improve, you'll find that lighting is only half the equation, asset quality matters just as much. Purpose-built asset platforms that integrate directly with your 3D software (pulling assets straight into your scene without manual import) are increasingly changing how artists build their scenes, letting you stay focused on the creative work rather than the file management.
Final Thoughts
HDRI lighting is one of the easiest ways to level up your work. Spend an afternoon playing around with different environments from Poly Haven, and you’ll see exactly why everyone uses them.
The renders that make people stop and ask, "Is that actually a photo?" usually have great lighting at their core. HDRIs are your fastest path to getting there.
Now go download a few from Poly Haven, throw them at whatever you're working on, and see what happens. You might be surprised how quickly 'good enough' becomes 'actually great'.
Resources Mentioned in This Article


Where to find the best free stuff and how to actually use it
A practical guide for 3D artists - from first render to photorealistic results
We all have that one moment in 3D: you swap out a boring, flat light for a real HDRI, hit render, and suddenly everything just clicks. Shadows look right, reflections look real, and your scene finally feels like it exists in the real world. Honestly, it feels like a bit of a cheat code.
That’s the magic of HDRI lighting. The best part? You don’t need to spend a dime to get started. There are amazing free libraries out there, and once you know the ropes, you’ll never go back to basic lights again.
In this guide, we’re going to break it down simply: what HDRIs are, where to grab the best ones for free, and exactly how to plug them into your workflow.
1. So, what exactly is an HDRI?
HDRI stands for High Dynamic Range Image. Don’t let the name scare you, it’s basically just a 360-degree photo that captures all the light data from a real location, not just the colors.
A normal photo (like a JPEG) is like a flattened-out version of reality. If you try to use it for lighting, it won’t have enough "punch" for the highlights or enough detail in the shadows. An HDRI keeps that data, so the sun in the image actually acts like a sun in your 3D scene.
Think of a regular photo as a snapshot, and an HDRI as a measurement. One records appearance - the other records physics.
In 3D software, when you drop an HDRI into your scene as an environment, the renderer reads those light values and uses them to illuminate your model with mathematically accurate, real-world light. That's why it looks so right, because it IS right. It's actual photons from a real place, doing real things to your virtual geometry.
HDR vs EXR: Which one should you pick?
You’ll mostly see .hdr and .exr files. They both work great, but .exr is usually the pro choice because it’s better at compressing without losing quality. If you have the choice, go with EXR.
2. Why use them? Can't I just build my own lights?
You definitely can, and for some specific product shots, you’ll still want that manual control. But for most scenes, HDRIs give you a massive head start because:
Natural, complex light bounce that feels real
Reflections that match the environment (crucial for metal, glass, wet surfaces)
Ambient occlusion that comes naturally from the scene's geometry and light direction
Sky gradients that look like actual skies, not gradients
Mood - HDRIs carry the feeling of a real place
Plus, it’s just faster. You can spend an hour tweaking studio lights, or 30 seconds dropping in an HDRI and rotating it until it looks perfect.
Pro Tip: You can use an HDRI for lighting while hiding it from the camera background - your render gets all the natural light while your backdrop stays clean for compositing.
3. Where to get the good stuff (for free!)
Don’t waste your time on sites that only give you tiny "previews" for free. These are the real-deal libraries that pros actually use:
Poly Haven (polyhaven.com) - The Gold Standard
The absolute king. Everything here is CC0, which means you can use it for anything, commercial or personal—without paying a cent. High quality, massive variety, and no account needed. Bookmark this one immediately.
License: CC0 - completely free, even commercial
Resolutions: 1K to 16K
Categories: 250+ environments
File formats: .hdr and .exr
ambientCG (ambientcg.com) - HDRIs + Textures
Mostly known for textures, but their HDRI collection is growing fast and is also completely free. It’s great for urban environments and interior shots.
HDRI Haven Archive (hdri-haven.com)
HDRI Haven was the predecessor to Poly Haven and technically redirects there now - but if you find old tutorials referencing it, know that the library merged into Poly Haven. Same great assets.
OpenFootage (openfootage.net)
A smaller collection, but worth knowing. Good for aerial and nature-focused HDRIs that aren't covered as well elsewhere. License varies per asset, always check before commercial use.
Unsplash / Humus HDRIs (hdrskies.com)
More curated, fewer in number, but some of the most beautiful sky HDRIs available. Particularly good for architectural visualization work where a dramatic sky can make or break a still.
Quick Reference: Free HDRI Sources
Source
Cost
Best For
Poly Haven
Free (CC0)
Everything - most comprehensive
ambientCG
Free (CC0)
Interiors, studios, urban scenes
OpenFootage
Free*
Aerials, nature, wide landscapes
hdrskies.com
Free / Paid
Dramatic skies for archviz
Textures.com
Freemium
General environments, some HDRIs
* Check individual asset licenses for commercial use.
4. Putting it to work
So you’ve got your file. How do you actually use it? While every app is a little different, the goal is always the same: you’re telling your software to wrap this image around your scene like a giant, glowing balloon.
Blender
Blender makes this beautifully simple:
Open the Shader Editor and set it to World (top left dropdown)
Add an Environment Texture node (Shift+A → Texture → Environment Texture)
Connect its Color output to the Background node's Color input
Click 'Open' on the Environment Texture node and load your .hdr or .exr file
Render - you're done
To rotate the HDRI (adjust where the sun is), add a Texture Coordinate node and a Mapping node between them. The Z rotation on the Mapping node spins the entire environment.
Blender Tip: In the Viewport, press N to open the sidebar → View tab → check 'World Space Lighting' to see the HDRI in your viewport in real-time without needing to render.
Autodesk Maya (Arnold Renderer)
In the Render Settings, make sure you're on Arnold Renderer
Open the Arnold menu → Lights → Skydome Light
In the Skydome Light's attribute editor, find the Color swatch and click it
Switch the color type to 'File Texture' and browse to your HDRI file
Adjust the Intensity and rotation as needed
For RenderMan or V-Ray in Maya, the process is similar but accessed through their respective light dome primitives. The concept is identical - you're always feeding the HDRI file into a spherical/dome light that wraps around your scene.
Cinema 4D
Go to Create → Environment → Sky (or Physical Sky if you want more control)
In the Sky's material, open the Luminance channel
Enable Texture and load your HDRI
Set the texture projection to Spherical
Adjust the global illumination settings in your Render Settings for best results
Whatever software you use, the fundamental idea is the same: you're placing a glowing sphere around your scene that emits light based on the values in the image. The rest is just knowing which menu to find that sphere in.
5. Choosing the Right HDRI for Your Scene
This is where the craft comes in. A technically perfect render with the wrong HDRI will still feel off. Here's how to think about selection:
Match the Mood, Not Just the Light
An HDRI carries an emotional quality. A golden-hour HDRI on a suburban street will feel warm and nostalgic. The same street under an overcast HDRI feels muted and melancholy. Neither is wrong, they're just different stories. Ask yourself what feeling you want the viewer to have before you start scrolling.
Consider the Reflections
If your scene has reflective surfaces, metal, glass, polished stone, wet pavement - the HDRI will show up in those reflections. An outdoor HDRI in an indoor product scene will look weird the moment the camera catches a reflection of a distant mountain in the chrome. Match the environment logic of your scene.
Resolution Matters More Than You Think
The resolution of an HDRI affects how sharp the light sources are. A low-res HDRI won't render a crisp sun shadow, the sun becomes a blur. For scenes with hard shadows, use at least 4K, and 8K if your render times allow it.
Time of Day = Light Colour
Golden hour HDRIs have warm orange/red tones. Noon HDRIs are harsh and white. Overcast skies are soft and diffuse (fantastic for portraits and product renders, they act like a giant softbox). Night HDRIs can be dramatic with street lights and stars. Browse with your scene's time-of-day in mind.
Creative Tip: Mix an HDRI for lighting with a completely different background image. Use the HDRI's lighting data but render your own sky or environment as the backdrop - great for compositing into live footage.
6. Common Mistakes Beginners Make
A few things that trip people up early:
Using an HDRI at full intensity without adjusting it. Some HDRIs are very bright. Drop the intensity to 0.5 or even 0.2 if your scene is blowing out. The default intensity in most software is 1.0, which is often too hot.
Ignoring the rotation. The sun position in the HDRI matters. If your scene logic suggests morning light from the left, but the HDRI's sun is coming from the right, nothing will feel grounded. Spend 30 seconds rotating until the shadows make sense for your story.
Using a 1K HDRI for final renders. Fine for quick previews, terrible for final output. Shadow edges will be soft and fuzzy where they should be sharp. Use 4K minimum for any render you'd actually show someone.
Forgetting gamma/color space settings. Make sure your HDRI is loaded as Linear or Raw, not sRGB. Loading as sRGB will double-gamma the image and wash out all the light values. In Blender this is handled automatically; in other software, always double-check.
Not experimenting. The best HDRI for a scene often isn't the obvious one. A cloudless sunny day HDRI on a drama render can feel too cheerful. Try the unexpected choice.
7. Beyond the Basics - What's Next
Once you’re comfortable with the basics, try mixing things up. Use an HDRI for the "soul" of the lighting, then add a manual "key light" to highlight specific parts of your model. It’s the best of both worlds.
HDRI + Manual Light Mixing
HDRIs don't have to work alone. A common pro technique is using an HDRI at low intensity for ambient bounce and reflections, then adding a single directional light to control the key shadow. You get the natural look of HDRI with the compositional control of manual lighting.
Shooting Your Own HDRIs
With a DSLR or mirrorless camera, a tripod, and a fisheye lens, you can shoot your own HDRIs from any real location. Software like PTGui or Hugin stitches the bracketed exposures into a proper panorama. This is especially powerful for archviz work where you want renders to match the actual site.
HDRIs in Game Engines
If you work in Unity or Unreal Engine, HDRIs work similarly, they're used as skyboxes with lighting bake contributions. The same Poly Haven library works perfectly. Unreal's built-in HDRI Backdrop actor makes setup particularly fast.
Exploring Asset Libraries Built Around HDRI Workflows
As your renders improve, you'll find that lighting is only half the equation, asset quality matters just as much. Purpose-built asset platforms that integrate directly with your 3D software (pulling assets straight into your scene without manual import) are increasingly changing how artists build their scenes, letting you stay focused on the creative work rather than the file management.
Final Thoughts
HDRI lighting is one of the easiest ways to level up your work. Spend an afternoon playing around with different environments from Poly Haven, and you’ll see exactly why everyone uses them.
The renders that make people stop and ask, "Is that actually a photo?" usually have great lighting at their core. HDRIs are your fastest path to getting there.
Now go download a few from Poly Haven, throw them at whatever you're working on, and see what happens. You might be surprised how quickly 'good enough' becomes 'actually great'.
Resources Mentioned in This Article
Poly Haven - polyhaven.com
ambientCG - ambientcg.com
OpenFootage - openfootage.net
hdrskies.com
PTGui (HDRI stitching) - ptgui.com
Hugin (free HDRI stitching) - hugin.sourceforge.io